By Craig Johnston March 1, 2025
Category Archives: Technical Articles
Winterizing
By Craig Johnston Oct 19, 2024
Why Winterize?
Our boats have several systems carrying water that can freeze and cause damage ranging from burst hoses and cracked pumps to cracked engine blocks, and in the extreme, boats sinking at the dock. A little prevention each fall can prevent time-consuming and expensive repairs next spring. While boat owners in the Northeast or Midwest face extended periods of cold weather that often calls for haulout, storage on the hard, and draining of water and coolant, we in the Pacific Northwest typically leave our boats in the water. But since weeklong spells of temperatures below 25°F usually occur each winter, serious damage can result without protection. We generally winterize in early December when the boat may sit unused for several months or as soon as extended cold weather is forecast.
What Systems Need Winterizing?
Any system with water in it can freeze under the right conditions:
- Engine
- Water tanks
- Marine heads
- Sinks and drains
Protection from freezing can be had by either draining a system of all water or adding antifreeze. What type of antifreeze depends on the system, as toxicity and the effect on rubber and plastic parts is different for each. And of course there are other maintenance tasks best done in the fall, such as changing the engine and transmission oil. Dirty engine oil contains acids and combustion byproducts that are best not to leave in place over the winter.
Engine
Most of our boats have diesel engines that have both freshwater and raw water systems. The freshwater system should contain a solution of either ethylene glycol (EG) or propylene glycol (PG). EG is used in most cars but is toxic to humans and pets. PG is non-toxic (it is found in everything from toothpaste to many prepared foods) but also more expensive. Both are considered hazardous waste if they have been in the engine for years, but neither is actually very polluting if dumped unused into the river.
Your freshwater system coolant should be changed every 5 years or every 1000-10,000 hours. (A glycol refractometer can be used to determine if the coolant is functional.) Drain from the low points on the engine block and also the drinking water hot water tank heating loop. There are numerous YouTube videos to illustrate. The used coolant should be captured and recycled as it contains lead and other pollutants. Refill with a 50% solution of EG. It is important to avoid air pockets that can cause engine overheating and damage; fill through the radiator cap, run the engine, and refill until the level is stable. As an added precaution, I keep the shore power on to the hot water tank, on the theory that there will be some convection flow of the heated coolant back through the engine.
The raw water system takes in river or sea water, passes through the heat exchanger to cool the freshwater coolant, and then injects it into the exhaust riser. Unlike the freshwater system, the raw water system uses a rubber impeller pump that can be damaged by alcohol or PG, so EG is also recommended for the raw water system. Super-conscientious boaters change their impellors once a season; while not necessary, inspecting it yearly is recommended and fall is a good time to do that
To winterize the raw water system, first close the intake thru-hull seacock, then open the strainer and clean the strainer filter. The next step is to run the engine while adding the ethylene glycol full strength. I do this by pouring the antifreeze directly into the strainer. If it is convenient to remove the intake hose, you can put it into a pan or bucket filled with antifreeze. Stop the engine when antifreeze starts coming out the exhaust. This ensures that the engine, hoses, and wet muffler all contain antifreeze. Put a tag showing that the intake is closed somewhere it can’t be missed.
Drinking Water System
For our boats wintering in the river, it is not too likely that the water tanks will freeze. There is more of a problem with the pressure pump or a foot pump. On Sequoia, I turn off the pressure water each time we leave the boat. For winterizing, I turn on all of the taps including the shower at the stern until no water flows, then loosen the strainer next to the pump to allow the water in the hose to drain back into the tank. (We had the hand-held shower crack by leaving water in it over the winter.) If you have an easy way to drain the water lines at a low point, that is even better. If you drain the water system including the hot water heater, take care to turn off the AC power to the heating element, perhaps taping the breaker switch in the “OFF” position as a reminder. While some boaters put non-toxic water system antifreeze (which is based either on alcohol or PG) in their tanks, it can encourage bacterial growth unless full strength and is a pain to flush out in the spring; I don’t recommend it.
If your boat has a watermaker that is pickled, the pickling chemicals will protect the RO membrane. But it is best to drain the raw water intake lines and filters. When pickling our watermaker, I put new filter elements into dry housings, so they are fresh when the system is restarted.
Head and Black Water System
The head pump is fairly well insulated from the water outside the boat and can freeze and crack if left full of water, as happened to George Stonecliffe on Julia Max last winter in Portland. Prior to winterizing the head is an ideal time to de-calcify the hoses with a marine head treatment or mild acid such as CLR. Then, after flushing the chemicals from the head and holding tank, pump everything dry. I use regular automotive EG antifreeze (I used to use RV water system antifreeze until I learned that it damages the joker valve). I pour antifreeze full strength into the head and pump with the intake closed until it fills the hoses. I then close the seacocks and put a reminder tag somewhere I won’t miss it in the spring.
If you have a shower sump, make sure it is drained or pumped dry.
Sinks and Drains
An open through-hull for your sink drain will have constant contact with the water outside the boat and is unlikely to freeze. But hoses may have a low spot and a burst hose could sink you boat. I recommend closing the sink drain seacock(s) and filling the hose up to the sink with antifreeze. Here is a case where the best product to use is RV antifreeze (water or PG based). Again, create a tag as a reminder.
Winterizing the Interior
With our wet winters it is important to keep interior moisture down to prevent mold and mildew growth. On Sequoia we have four dorade vents and several hatches that can be kept cracked open to allow a good flow of fresh air. We also deploy several of the low wattage warming fans to keep air moving. Other suggestions:
- Clean and dry salty harnesses, life vests and foul weather gear
- Remove any opened food packages, excess clothing, and linens
- Clean and air out the fridge and freezer
- Space cushions and mattresses to allow air circulation
Doing these chores will only take a short day at the boat and will make for a much happier opening day!
Watermaker Install on No Regrets
By Bruce Bayne, 3/25/2022
Having a watermaker onboard or not can be an interesting debate. There are numerous posts in online forums on the subject, if you desire going down that rabbit hole. We discussed the subject for some time and decided it was important to be freshwater independent. Meaning that we would never have to plan our stops around water. We had also heard that if purchasing a watermaker, buy the largest capacity watermaker that fits your budget. I’ll add to that…and buy the largest watermaker you can fit on your boat.
We decided to purchase a 30gal/hr 120vac unit from CruiseROWater. The decision wasn’t an easy one, as there are a number of choices. I knew I wanted a kit that used off-the-shelf components, as the drop-in units often use proprietary components that can be difficult to source and expensive to replace. An off-the-shelf watermaker kit made sense, as these systems are usually basic and simple. This meant I could find the parts and repair it myself if and when it needed fixing.
There are some basic choices to be made in selecting a watermaker system. The first is how the unit will be powered, either from the 12V (or 24V) DC system, or 120VAC.
AC systems require either shore power, a generator, or a suitable inverter.
The second choice involves the capacity in gallons per hour, which directly affects power requirements. Overall boat power management must be considered.
Note that some systems are available that use a mechanical pressure amplifier called a Clark Pump to improve efficiency up to 3 times.
Craig Johnston
A very important step not to skip
Before we purchased the watermaker, I needed to know if all the components would fit in the boat and where they would fit, as watermakers are not tiny. A 30gal/hr unit requires two 44” pressure vessels, and I wasn’t sure I had room for two. I certainly didn’t want to purchase two pressure vessels and find out I only had room for one.
Most watermakers have two large components, and various smaller components, hoses, and tubing. The reverse osmosis (RO) pressure vessels are 44” long and about 3” in diameter each. The high-pressure pump that forces the water through the RO membranes has a rather large and heavy 1hp electric motor with a high-pressure pump attached to it. It’s about 10” in diameter and 18” long and weighs about 50 pounds. They each needed a home on our boat.

I usually make cardboard mockups of large things to ensure they will fit in the space intended. I’ve done this with our holding tank and a freshwater tank. This gives me the ability to move the mockup around to find the best fit. In my opinion, this is the single most important step to installing anything that has any size to it. So, I bought some 3” in diameter mailing tubes and cut them to the exact size of the two pressure vessels. I then mocked up the high-pressure pump with some cardboard to simulate its relative sizes.
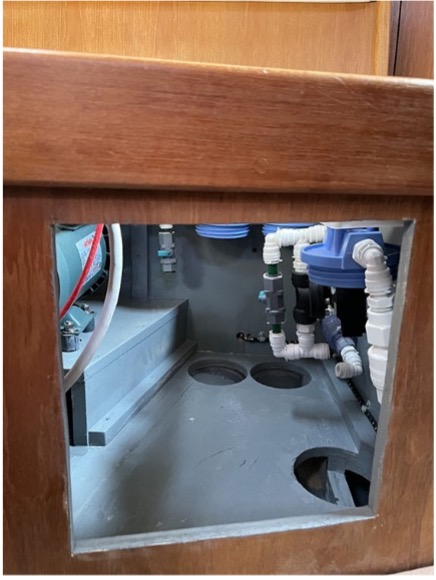
After a bit of trial and error I was able to find a place under the cabinet behind the port settee where both pressure vessels would fit. Normally the pressure vessels are mounted with hardware that sets the two side-by-side. I didn’t have the room to do this, but I did have the room to mount them individually in that space. This would require separate mounting hardware and an extra hose with different hose fittings to connect the two pressure vessels together. I consulted with the manufacturer on this and they said it wouldn’t be a problem.
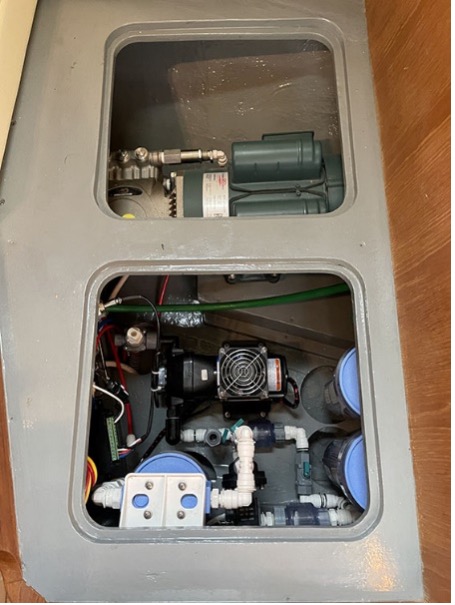
The only place I found where I could mount the high-pressure pump was under the “L” portion of our port settee. There physically was room, but the hull slopes up in that area, so I needed to build a shelf to sit the high-pressure pump on. Once these two components had homes, I was confident they would fit, so I placed the order for the 30gal/hr watermaker.
Installing the components
The instruction manual that comes with this watermaker is quite complete. It details how the components go together, the flow of both salt and fresh water, and how to wire the two pumps. Exactly how it all fits together is determined by the location of each component from one another and the obstacles the hoses and tubing have to go around or through.
After studying the manual, I used Adobe Illustrator to make a drawing of how the components would be connected together within the space I had available for them. I went through several iteration of drawings until I had one that I felt worked best. I now had a drawing that showed each and every valve, elbow, and length of tubing I needed, and how they would fit together.
The kit came with quite a bit of tubing of several sizes and a bag of fittings. I took inventory of the fittings to see if I had the fittings I needed based on my drawing. I was shy a few, so I found a source online to purchase the extra fittings I needed.
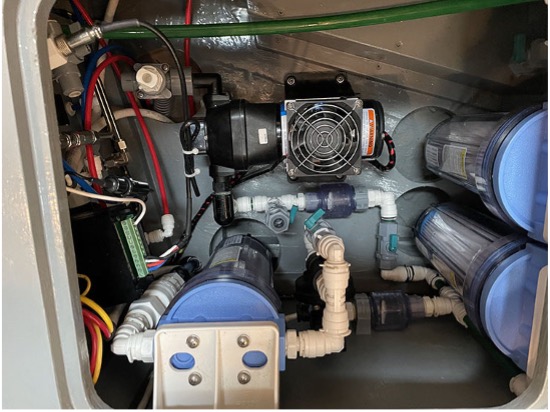
It seemed best to install the two largest components first, the pressure vessels and the high-pressure pump, as these could only be mounted in the spaces I identified for them using the mockups, and they were going to take the most time to mount. All the hoses, tubing, filters, and boost pump were small, and I had enough room in the locker to mount them without issue.
Our boat had one access hatch for the “L” portion of the settee. This didn’t give me enough room to mount the high-pressure pump, so I cut a second hatch over the space where the pump was going. I then built a plywood shelf and epoxied it onto the hull. This took a bit of time, but I felt it was necessary for a proper installation of the heavy high-pressure pump.
The high-pressure pump motor has a metal base with four bolt holes to attach it to the shelf. It didn’t come with any vibration dampening mounts, so I found some online that would do the job nicely. These mounts would prevent the motor vibration from transferring to the hull, hopefully keeping the noise from the motor down a bit. Before I mounted the motor, I connected the wiring and pressure relief valve tubing as they would have been difficult to connect once the motor was in place.
Next, I mounted the pressure vessels under the cabinet. Other than being a tight fit, I was able to get them mounted easily with some help from my wife, Lynette. I also attached the high-pressure hoses and the freshwater tubing at that time so the pressure vessel portion of the install would be complete.
The water flow for the watermaker requires two through hull fittings; one for the seawater intake into the watermaker and one for the waste brine to exit. I already had a through hull for the intake, so I only needed to drill a hole above the waterline and mount a small through hull for the waste brine.
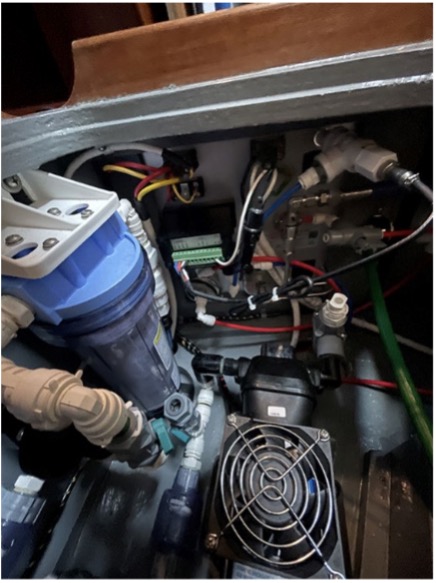
Once the through hull was mounted, I installed the three filter housings and connected the components with the tubing and fittings as per my drawing and the instruction manual. The locker below the settee didn’t have enough headroom to unscrew the filter housings and remove the filters, so I had to cut holes in the floor below the filter housings to allow the housings to be lowered enough to get the filters in and out. Luckily I had about 4” of space between the hull and the floor of the locker. I decided not to mount the boost pump until I had all the tubing installed and the hose from the through hull installed. That way I could place the boost pump exactly where it needed to be to connect to the tubing and hose.
Probably the most difficult task was to snake a ¾” hose from the through hull under the galley sink to the locker where the watermaker was being installed. It was about a 15’ run and required drilling some holes in very inaccessible locations to get the hose installed. At the same time, I wire tied two ¼” tubes that supplied fresh water to the water tanks and sample water to one of the sink foot pump faucets for testing. This way, when I installed the ¾” hose the two tubes came along for the ride. Once the ¾” supply hose was installed I was able to install the boost pump in exactly the correct location to connect to the supply hose.
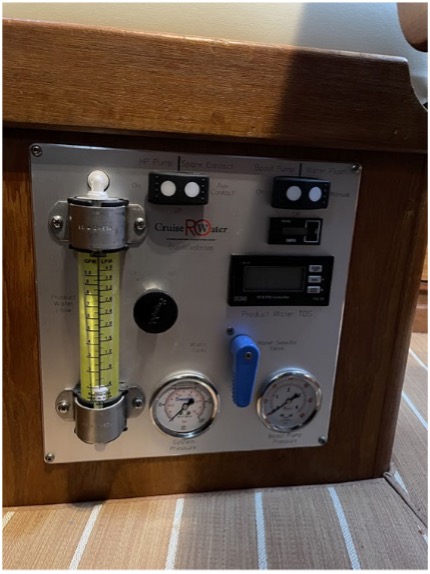
This watermaker has a very nice control panel with everything you need to run the watermaker. I cut a hole in the side of the settee to mount the control panel. Some of the tubing and hoses needed to be attached to the back of the control panel. Once that was done, the liquid side of the watermaker install was finished.
Our watermaker uses both 120vac and 12vdc. I had to add a breaker to each electrical panel and run two sets of wires from the panel to the watermaker control panel. The 120vac is for the high-pressure pump and the 12vdc is for the boost pump. I wired the high-pressure pump into the normal house 120vac panel so I could use the inverter to power the watermaker when the engine was running or hook the Honda generator to the shore power cord to run the watermaker when we weren’t running the engine. That way I had two sources to power the high-pressure pump that were convenient to use.
Commissioning the watermaker
Once the electrical was done it was time to test for leaks and commission the watermaker. We made a short trip out of the marina in Barra de Navidad to be in clear water for the testing. The instruction manual gives clear instruction on commissioning the watermaker, so after reading that portion of the manual, I proceeded to test the watermaker. As soon as both pumps had run for a bit and the air was purged from the system, I increased the pressure to the RO membranes. When the RO membranes had about 800psi of saltwater pressure the watermaker was making about 30gal/hr of fresh water. I then checked for leaks all along the plumbing. Luckily there were no leaks.
Watermakers require frequent freshwater flushes of the membranes when not in use to prevent the buildup of bacteria and organisms. I set an event in my Google Calendar to remind me every three days to switch on the freshwater flush for 3-5 minutes. Some watermakes have a feature to do this automatically. Ours had an option we could purchase, but we decided it was simple enough to do it manually. Less to go wrong in my opinion. Yes, I have to remember, but it’s not the end of the world if I forget one time here and there. If we plan to be gone for an extended period of time, I will just prepare the membranes for extended storage. This is called pickling the watermaker and isn’t too difficult to do.
In summary
In summary, plan, plan, plan, and read the manual. Installing our watermaker wasn’t an overly complicated process. Simple knowledge of plumbing and electricity is necessary, along with the ability to read a manual and follow the instructions. Building both physical mockups and digital ones in Illustrator were important for me, as I like to have a plan I can follow.
We now can make water anytime we want as long as we are in reasonably clean water, which is usually when we are on passage. We’ve filled the two 45gal tanks several times now and the water tastes great. We are now finally freshwater independent.
Gallery:


You must be logged in to post a comment.